Saltillo is basically a rough-edged terra-cotta tile that originates in Saltillo, Mexico and one of the famous products of the country. It can be found in various shapes and variety of colors, especially in reds, oranges, and yellows. Saltillo tile installation needs to be done very carefully and need to avoid some mistakes while installing saltillo tile, as these tiles are elegant and use of any chemicals or grout can damage them. Saltillo tiles are comparatively inexpensive but installing the tiles is a difficult and time-consuming process which makes it very expensive. Hence, the installation requires professional hands, since we are professional saltillo tile contractors for more than 12 years, we can offer you the best.
Mostly, these tiles are given shapes by pressing the clay with the help of a wooden frame. Laying and sealing Saltillo tile floor is very similar to working with other tiles such as slate or ceramic. Apart from other tiles, there is no glaze on the surface of the Saltillo tile. Saltillo tiles are highly porous in nature, but one of the most durable and attractive. These tiles are the ideal choice for the warmer climates, and for bathroom, kitchen or utility room.
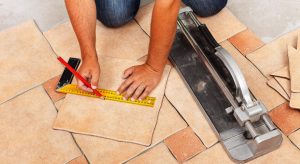
Saltillo Tile Installation Process
If Saltillo tile is installed perfectly with professionals help, it can transform the look of your floor. Our experts share with you here the recommended Installation materials and guidelines to install Saltillo tile floor.
Step 1: Clean-off the tile and the floor
When you are planning the installation of the Saltillo tiles, you have to make sure that your surface is smooth, dry, and perfectly prepared to seal and the tiles themselves are completely clean. Make necessary repairs, patch, and level any damaged or uneven surfaces of the floor. Make sure that surface is free of wax and grease etc. Take out moldings or any appliances or obstacle that may restrict in the way for tiles installations. Check the doorjambs to make sure that tile has clearance when going to be installed. You can also place a cement board underlayment if necessary. Be sure that this step is all clear before moving up to next step. Our available stock of Saltillo tile materials in our showroom is of every size, pattern, and color you want to match with your flooring requirements.
Step 2: Apply thin set mortar
After area get prepared on which tile is to be set, allow bonding of thin set mortar to the floor. One needs to use only thin-set mortar for installation and never to use mortar with cement. Thin set mortar should be applied with a troweled mortar onto an area of the floor, working in one small area at a time.
Step 3: Place the first tile
For laying the first tile on the floor, you need to find the center point of the room. Then, draw two lines with chalk, one from the midpoints of two opposite side walls and another from the midpoints of the other two walls. Where they intersect will be the center point of that room. Measure all the 4 walls of the room. Placing the tile should start from the center point. If the room is not square, you have to make adjustments to the position of the one line and then square the other line by using the 3-4-5 method. ( 3-4-5 method – after checking that chalk lines are square by marking point 3 feet on one chalk line and 4 feet on a perpendicular chalk line. You need to measure the diagonal space between each of these points. If the distance between the two is exactly 5 feet then the lines are square. Place a thin layer of the mortar onto the back of the tile and then lay it on the area and tap over the tile surface with the wooden handle of a tool. If a hollow sound is heard, pick up the tile and apply more thin set mortar to the areas where required.
Step 4: Continue placing the tiles
After taking centre tile as a reference point, get started to install the leftover tiles. Just make sure to apply enough mortar so that tiles get fixed. After setting up the tile, press it properly. Keep the space between the tiles for making grout lines. If there is any tile which needs to be cut to get it fit on the floor, cut it carefully with the help of wet saw so that tile doesn’t get damaged.
Step 5: Apply the Sealer
The exact way to apply a sealer mostly depends upon the sealer you are using so you should read properly the manufacturer’s instructions. Before applying the sealer, make sure that surface must be dry, dirt-free and free of waxes. The method of using a sealer to a rough and textured surface is quite different as compared to the smooth or polished surface. On for applying sealer highly porous or textured surface, you should use a sponge, brush or a pump sprayer. On the smooth or polished floor, you can use a flat applicator such as microfiber applicator or lamb’s wool instead of brush or roller. Apply the second coat when the first coat is dry completely and allow a 24-hour period before grouting.
Step 6: Apply the Grout
Grout is used for filling the spaces between each tile. It prevents the tile from shifting from its exact place. Read the instruction properly written on the packet and follow it. The main benefit of the grout is that it prevents the water to get it into the tile seam. Gently remove the plastic spacers from between the tiles with the help of needle-nose pliers and pull the spacer out and repeat this process again to all gaps in between the gaps of tiles. After grouting, let it stay for about 10 to 15 minutes before washing the excess away and avoid using acid or any caustic material on tiles. Grouting process must be properly done and there should be no stains, cracking or any damage left over. Wash excess away using a damp sponge and allow grout to cure for about 72 hours before use.
Step 7: Apply a final sealer
The last step for the installation of Saltillo tiles, Make a final re-coat of the sealant on the grout floor area to extend the life and shine of Saltillo tile and to provide an added layer of protection to avoid it from minor scratches. Leave this for few hours to let it dry and the floor is ready to use.
Westside Tile and Stone is well known in and around the greater Los Angeles area not just for its great quality floors, but also for full-service flooring installation. Our experienced salespersons and interior designers will help you in having a beautiful house with a good and reliable flooring. Our crew provides perfect customer care of designing, choosing and installing the right tiles along with necessary tools. Once your saltillo tile floor installation is finished with our expert’s help, you can start using your floor right away and enjoy its benefits for long lasting years. Contact us today to find out more information about Saltillo outdoor tiles and its installation or visit our tile store where our design experts are ready to help you. We work with the residents of Agoura Hills, Beverly Hills, Brentwood, Calabasas, Malibu, Northridge, Pacific Palisades, Santa Monica, West Hills, West Hollywood and the bordering neighborhoods in Southern California.